scallops in tomato basil chipotle cream sauce

Cover Scallops

I have to admit something here. I know it looks like I must cook a lot at home, but to be quite honest the husband has been the main cook in our household for a while now. I love to bake more than cook, and I could do cereal for dinner instead of a real meal. I make the fun sporadic meals but he makes the daily ones.

That being said, our local Central Market grocery store always has simple recipes to follow. This time it was scallops, a crustacean I tend to shy away from but the husband loves. Last Friday, I was lucky enough to have the day off and wanted to have dinner ready when he got home! (I’m such a great wife, sometimes.) This recipe was greeted with a warm welcome and a smile! The hubs said it was amazing more than once and even had the leftovers the following day. I too had my fair share and must say it was pretty tasty and super easy to make!!

Recipe

IngredientsIngredients

  • 1 lb bay scallops
  • 1 Tbsp olive oil
  • 1 Tbsp butter
  • 1 Tbsp garlic, minced
  • 1 cup heavy cream
  • 1 Tbsp Tomato Basil & Chipotle seasoning, or to taste
  • salt and pepper, to taste

Heat butter and olive oil together in a sauté pan. Add the garlic and cook for 1 minute. Add the tomato basil and chipotle seasoning to the pan, stirring to blend and cook for another minute. Add the cream, blending, with the spices and cook at medium-high heat until sauce has been reduced by one third.

cream sauce

Add scallops and cook (turning often) another 3-5 minutes.

cooking scallops

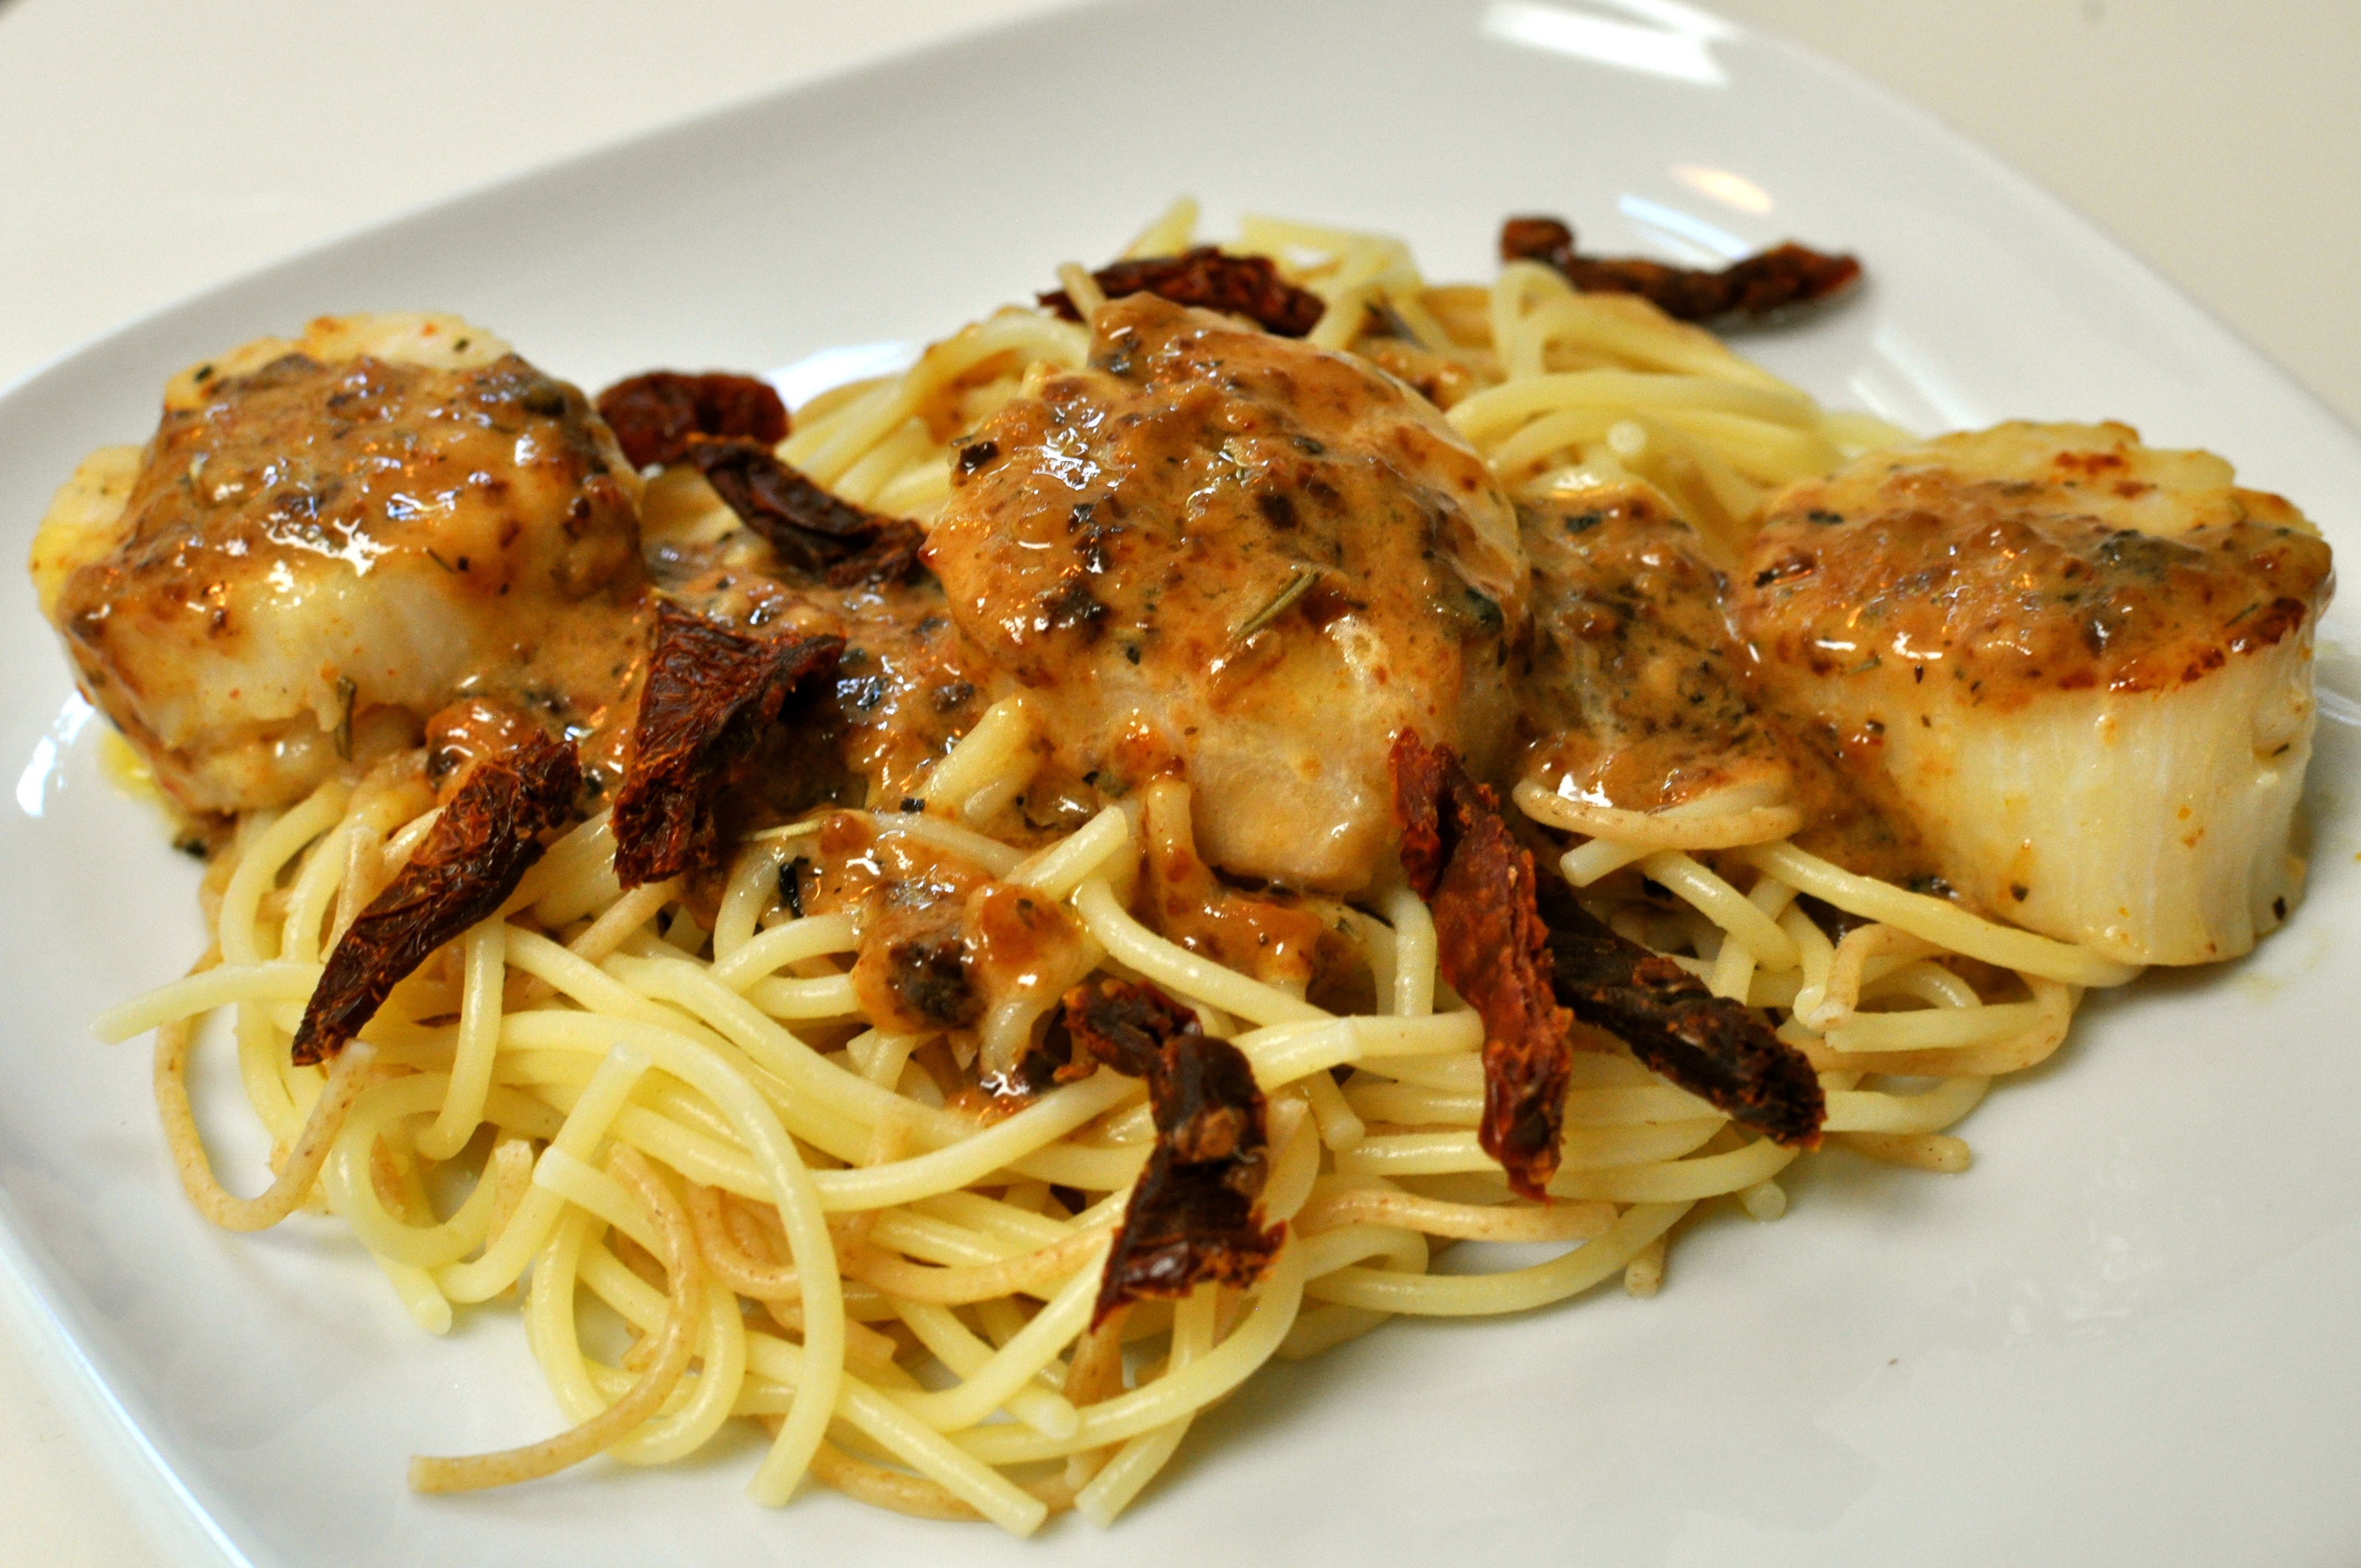
Remove from heat and serve over pasta. I added sun-dried tomatoes to mine for taste and visual appeal. Enjoy!

final scallops

nursery art

I’ve been thinking about the nursery walls lately but making little progress actually purchasing the wall art, until now!

Beaver

frog

Have you seen these? I don’t know about you, but I think these prints are adorable! They are handsome but playful. I found them on Etsy and saw them again on Senera & Lily a couple years ago. I’ve had them in my “favorite” section on Etsy since then but never knew quite where to put these creatures until now! All that time has passed, and I cannot think of a better location to put these wonderful animals than the nursery.

Actually last year, I tried to persuade one of my friends to put it in her nursery, but she had other prints in mind for her baby boy. Honestly, I’m glad she didn’t because now I get the chance to use them! I picked out six 5×7 prints (it was hard – there are so many to choose from) which I plan to frame and display on right side of the nursery window as you walk into the room. I already have a faux paper layout of my idea set up in the nursery and am looking forward to putting up the real thing soon!!

owl

I’m so excited about these prints. I tried to pick animals the baby/toddler will be able to relate to and am excited for when he can point to them and give their names and sounds. So fun! I’m happy to see the starting point of my nursery walls and have ideas of a gallery wall above the changing table, a shelf above the rocker and maybe some family photos dispersed throughout. I’ll keep you posted!

stl baby shower

stl invite

This past weekend was spent with extended family in St. Louis. My mother-in-law and sisters-in-law put on a wonderful baby shower for me and our baby boy!

The Fam

They had everything displayed so nicely, but silly me only got a few pictures of the party. I was obsessed with this tablescape of a big “B” (for baby or boy) and the rhino my sister-in-law found at Target!

Baby B & Rhino

They served a delicious meal of chicken sandwich, pasta, and salad with gender specific cupcakes and cake balls for dessert! Aren’t they cute?!

cake balls

It was an intimate event with lots of laughs and conversation. I was lucky enough to catch up with family and old friends during my visit! It made me miss my time in St. Louis with them, and as always, wish for more time to visit!

BB plates

Julie's Friends

Paul's Grandma:Aunt

Friends

I was overjoyed with all the wonderful items baby boy got during the process! He is so blessed and loved already! I just hope everyone there truly knew just how happy and amazed I was at all the thoughtful people in the room. I seriously almost teared up a couple times just thinking about the generosity of these ladies’ time and effort. It was so much fun to have everyone involved. Even my sweet nieces helped out by passing out the gifts. They were such great helpers.

Kaylee & I

There were a couple gifts that were already trying to influence our baby boy’s future sports teams! I love them! I can’t wait to take them to Lambeau Field and Busch Stadium someday!

packer:cards

We also played a couple games; it couldn’t be called a shower without it! My friend Sarah is also pregnant and she’s waiting to find out the gender at birth! We were trying to figure it out earlier than that with a string test! The pencil will circle for girls and maneuver in a straight line for a boy. I was convinced it was a boy, but after seeing the test… I can’t be quite sure! Ha ha!

Sarah H

All-in-all it was a pleasant trip to St. Louis. The only trouble was finding enough room in our vehicle for all the baby boy’s new stuff! We had to leave the radio flyer in the grandparents’ garage but will pick it up on our next trip up! Thank you to all near and far that participated in this special day!

Me & Presents

**A special thanks to my sisters-in-law and mother-in-law for such a special event! I know they worked hard to make it perfect and it was!

i want a subaru

The marketing team at Subaru has won my heart with this commercial.

Only in my version, we have blondies (dogs & baby).  My version: a yellow lab that has been with me before my husband, a baby boy in the back seat as a blondie, too, and of course, a pug laying next to him. Makes me smile every time.

Happy Friday, Friends.

grandma anne’s chocolate chip cookies

Cover Cookies

Once again Grandma Anne has the perfect recipe for another staple cookie, the chocolate chip! It comes out perfectly fluffy and moist every time. Not too sweet, not to chocolaty, just perfect.

Every time I make this cookie, I’m reminded of when I was younger in her kitchen making these. She wasn’t a fan of samples of the cookie dough, and I laughed at myself, as I always secretly ate the last cookie raw. ;) It’s so yummy, I couldn’t resist! I hope you have the same success with this cookie as I always do! And I encourage dough sampling… Even though Grandma Anne would cringe.

Recipe

IngredientsJELL-O

  • 2 1/4 cups unsifted all-purpose flour
  • 1 teaspoon baking soda
  • 1 cup butter or margarine, softened
  • 1/4 cup granulated sugar
  • 3/4 cup firmly packed light brown sugar
  • 1 teaspoon vanilla
  • 1 package (4-serving size) Jell-O Brand Vanilla Flavor Instant Pudding Pie Filling
  • 2 eggs
  • 1 package (12 oz) chocolate chips
  • 1 cup chopped nuts (optional)

Mix flour with baking soda and set aside. Combine butter, the sugars, vanilla and pudding mix in a large mixer bowl; beat until smooth and creamy.

Mix

Beat eggs. Gradually add flour mixture.

Mixes

Then stir in chips and nuts. (Batter will be stiff.) Drop by rounded measuring teaspoonful, about 2 inches apart, onto ungreased baking sheet.

Pre-Baked Cookies

Bake at 375° for 8 to 10 minutes. Makes about 4 dozen. *For chocolate chocolate chip cookies, substitute chocolate flavor Instant pudding.

Final Cookies

Enjoy! These are the softest chocolate chips cookies I have had and continue to be my staple recipe for chocolate chip cookies. Thanks Grandma Anne.

mini herb garden

Cover Herb

I finally did it and took off another 33 before I’m 33 item in the process, with building a mini herb garden. I was at Lowe’s the other weekend picking out plants for the house (with my mother-in-law’s help) and decided to pick out three herbs to start a mini herb garden in my kitchen window. I looked for fun pots to put them in but settled for terra-cotta pots and saucers. I wanted to make them a little more fashionable, so I used Better Homes & Gardens‘ idea of painting the pots. It was a fun and easy way to bring a little personal flare to the pots and the window sill.

material

  • large rubber bands
  • terra-cotta pot and saucers
  • small paintbrush
  • primer
  • acrylic crafts paint or wall paint
  • aluminum foil
  • masking tape or blue wallpaper tape
  • spray shellac
  • craft knife
  • herbs or plants to pot

To start, stretch a rubber band around the base of each pot, positioning one side higher than the other to form a smooth curve.

Rubberband

Paint the saucers and the bottom section of each pot and saucer with primer right up to the edge of the rubber band. Let dry.

Primer

Paint each saucer and pot below the rubber band with craft paint. I did two coats of Benjamin Moore rockport grey, not craft paint and it worked well. Let dry.

Rockport

Wrap the top of each pot in aluminum foil, leaving the painted area below the rubber band exposed. Use masking tape to conceal any uncovered terra-cotta between the foil and the rubber band.

tape

Turn the pots upside down in a well-ventilated area. Following the instructions on the package, apply two or three coats of shellac to the painted portions of the pot and saucer. Let dry. I used Valspar’s clear sealer in satin which worked great!

Primer

Use a crafts knife to score the paint along the bottom edge of the rubber band. Cut off rubber band. Then plant your plants! I also got these herb markers which I bought on Etsy, and I’m in love with them!

herb markers

source

She has a variety to choose from and worked with me only wanting three! I highly recommend Paulova Ceramics! She has some other fun items like a salt and pepper cups that are on top of my list, too!

Final Herbs

wasabi deviled eggs

Cover Deviled Egg

I’ve been wanting to make deviled eggs for quite some time now, they seem so interesting and diverse. When Real Simple devoted a whole article about these little devils, I knew I had to try them. I decided on the wasabi variety, because the husband and I cannot get enough of the wasabi goodness. We love it anywhere we can get it; sushi especially. And Trader Joe’s even has this amazing trail mix with wasabi in it. Yum. You need to try it!

Wasabi WOW!

I digress, back to deviled eggs. This is a simple recipe and went over really well with even the semi-fans of wasabi! Enjoy!

Recipe

Ingredients

  • 6 large eggs
  • 1 to 2 tablespoons wasabi paste
  • 1 teaspoon fresh lemon juice
  • 1 teaspoon dijon mustard
  • kosher sat and black pepper
  • 1 teaspoon black sesame seeds (optional)

Place the eggs in a large saucepan and add enough cold water to cover 1 inch. Bring to a boil. Remove from heat, cover, and let stand for 12 minutes. Drain the eggs and run under cold water. Or in my case, I just used a couple hard boiled eggs I already had in the refrigerator.

Eggs

Peel the eggs and cut in half lengthwise. Transfer the yolks to a small bowl and mash with the mayonnaise, wasabi paste, lemon juice, mustard, and 1/4 teaspoon each salt and pepper.

Mixture

Spoon the yolk mixture into the egg whites. Sprinkle with sesame seeds or pepper and enjoy! Yum!

Deviled Eggs

colorado

Breck
I have to back up a couple of months and tell you about our fabulous vacation to Colorado. I needed to wait a little bit to post because I couldn’t explain why I didn’t actually get to go snowboarding until after our trip. I was 12 weeks pregnant on the trip and my OB strongly discouraged me from snowboarding. As I said in the past, we honestly didn’t think we would get pregnant for awhile, so why worry about booking a trip in January?!? Well it happened.

Even as I was talking to my sister-in-law about the inability to snowboard, she said, “It’s totally worth it!”

I replied “Is it really? I’m going all the way to Colorado and can’t snowboard!?!”

I wasn’t happy about my first trip out west to snowboard, and not actually snowboarding. It was really hard. There might have been tears. Instead, I made the best of it by scheduling all my OB appointments, catching up on reading, scheduling massages, manicures, and pedicures, and shopping in town. Plus, the hubs stayed in two days, so I wouldn’t lose my mind. It helped a lot. The weather wasn’t the greatest that weekend (-8 degrees during the day and -12 at night), so I was okay with staying in.Downtown BreckLuckily, the hubs found a fabulous cabin for me to nest in while everyone was skiing and snowboarding. It was SO cute and cozy, and we had great nights and mornings sitting by the fire.
Breck HouseWe did have a couple adventures with our Texas drivers in snow! It was pretty funny to watch and interesting to try to coach them through the icy hills, until Paul and I had to take the wheel and show them how it was done. One night (without the hubs and I), they resorted to leaving the vehicle and making the trek up the mountain to our cabin by foot. They were not excited about the climb when they came in and apparently neither were the people who owned the house where they left the car. When Paul and I went to get the car that next morning, we were greeted with this. Ha ha.
Bad SpotBreckenridge was a wonderful location for both skiers and snowboarders… and pregnant snowboarders. Our favorite places to eat that week were Fatty’s and Ollie’s. Ollie’s has their own bloody mary mix which was wonderful, which I got with extra pickles; this prego was in heaven.
Breck Eats & PeepsEven though I didn’t go snowboarding, I’m still counting it on my 33 before I’m 33 list. I hope next time I go, I’ll actually be able to snowboard, and I can’t wait for the day we have our little bambino in a snowsuit racing down the mountain!

Happy Travels to all!

let there be light

Pouf and Fixture

The father-in-law was here, the father-in-law was here! Easter weekend was spent with my in-laws at our house. They were nice enough to fly down for the extended weekend and help us with some house projects!

In Action

The husband and my father-in-law spent time switching out FOUR fixtures, two receptacles, and fixed a toilet! It was so motivating to have them here; it made me want to do even more!

The first fixture in the dining room was probably the hardest. They had to head up to the attic because I wanted them to place a fixture directly above the dining table and get rid of the center chandelier in the middle of the room. Now the space serves as both a living room and dining room instead of one big dining room. Below you can see the old chandelier in the middle of the room, reflected in the mirror.

Full Dining

I chose a 3-jar chandelier I got from West Elm (go figure). It worked perfect in the space. It doesn’t look too formal for the table, and I’m so pleased with the size!

Dining Room After Fixture

Dining Side view - Fixture

Then, the pair moved on to the kitchen. In our little kitchen nook, there was a big ceiling fan, which was nice, but I want the space to have a more structured spot for eating and entertaining. Plus the big ceiling fan wasn’t that aesthetically pleasing.

kitchen light - before

I decided on Ballard‘s Eldridge Pendant. I kept the existing placement of the electrical box (the guys were happy about that) but had them swing the chain to center the light over our little farm table. At first, I was a little nervous I got too big of a fixture for such a small space, but as I look at it daily, it really works with the space.

Kitchen Light

If that wasn’t enough, they moved to the nursery. There was a very dated fan in the nursery that needed to go!! I wanted some sort of chandlier or pendant for this space depending on if it was a girl or a boy. With a boy in my belly, I went with Serena & Lily‘s Birds Nest Hanging Pendant which my father-in-law affectionately called the waste basket. Here’s the before picture of the nursery.

Nursery w:Fan

And the nursery light after! I’m in love with the nursery light, and at night it makes a wonderful design on the ceiling! Again, I was worried about how big it was for the space but it worked perfectly! I absolutely love it! I think it looks a little more boy-oriented and again love the wooden look that accents the wood on the crib and the woods on the dresser!

Nursery Final

Lastly, we used our white kitchen fan to replace the current light in the guest room. The guest room had a fluorescent light in the room from the previous owners who used the space as an office.

guest room - office

All I had to do was clean up the fan, and I bought four new light globes for the fan to make it a little more modern. It felt good to reuse the light and get the old nasty fluorescent out!

Guest Room - Fan

It’s absolutely awesome to have that all off the to do list and all those lights off the ground and in there spots! I’m so thankful no one electrocuted themselves or fell through the ceiling! A big thanks to the husband and father-in-law for your extended efforts and work throughout the weekend!

nursery progress

I feel like we’re ahead of schedule on the nursery, yet we have so much to do!

Luckily, my friend said “seriously, all you really need is a crib (or somewhere to lay him), bouncer seat, diapers, a couple swaddle blankets, and you’re set. The rest is all for you.” Her boy has made it to year one already, so she must know something!

With that, the nursery is coming along. We got the crib, nook mattress, and crib skirt up and ready!
crib skirtThis past weekend, I picked up the dresser from West Elm. I am so thrilled with the different woods. I think it complements the wall color and crib, too. dresserWhen the dresser was assembled, I got excited and dressed it up with a changing table topper and pad, rocking bird, some baby items, and my husband’s bank from when he was a little guy. So cute!
baby gear
I picked out a couple more fabrics (Sarah Watt’s collection) for pillows and had a boppy cover made out of the crib skirt fabric! The husband thinks bear fabric looks girly with the flowers but I think it’s adorable for a pillow!
Fabric

Here’s the light fixture, I found the birds nest hanging lamp on Serena & Lily but bought it on Craigslist for 1/3 of the price. I love craigslist! I can’t wait to see it up! The pouf in the background was a DIY project and will act as the ottoman when I decide on a glider!

Pouf and Fixture

I also bought this giraffe bust from anthropologie! I think he’s so handsome and love paper mache animals, proof here! I just need to figure out where this will go in the space.
giraffe
The nursery looks a little plan but I’m glad we’re making progress! I’ll be back when the new light fixture is up, when I pick out more accessories and maybe have some wall art! This is so fun!