Happy Halloween, Friends!
 May your costume stay on…
 and may you get all the candy your heart desires!!


Happy Halloween, Friends!
May your costume stay on…
and may you get all the candy your heart desires!!
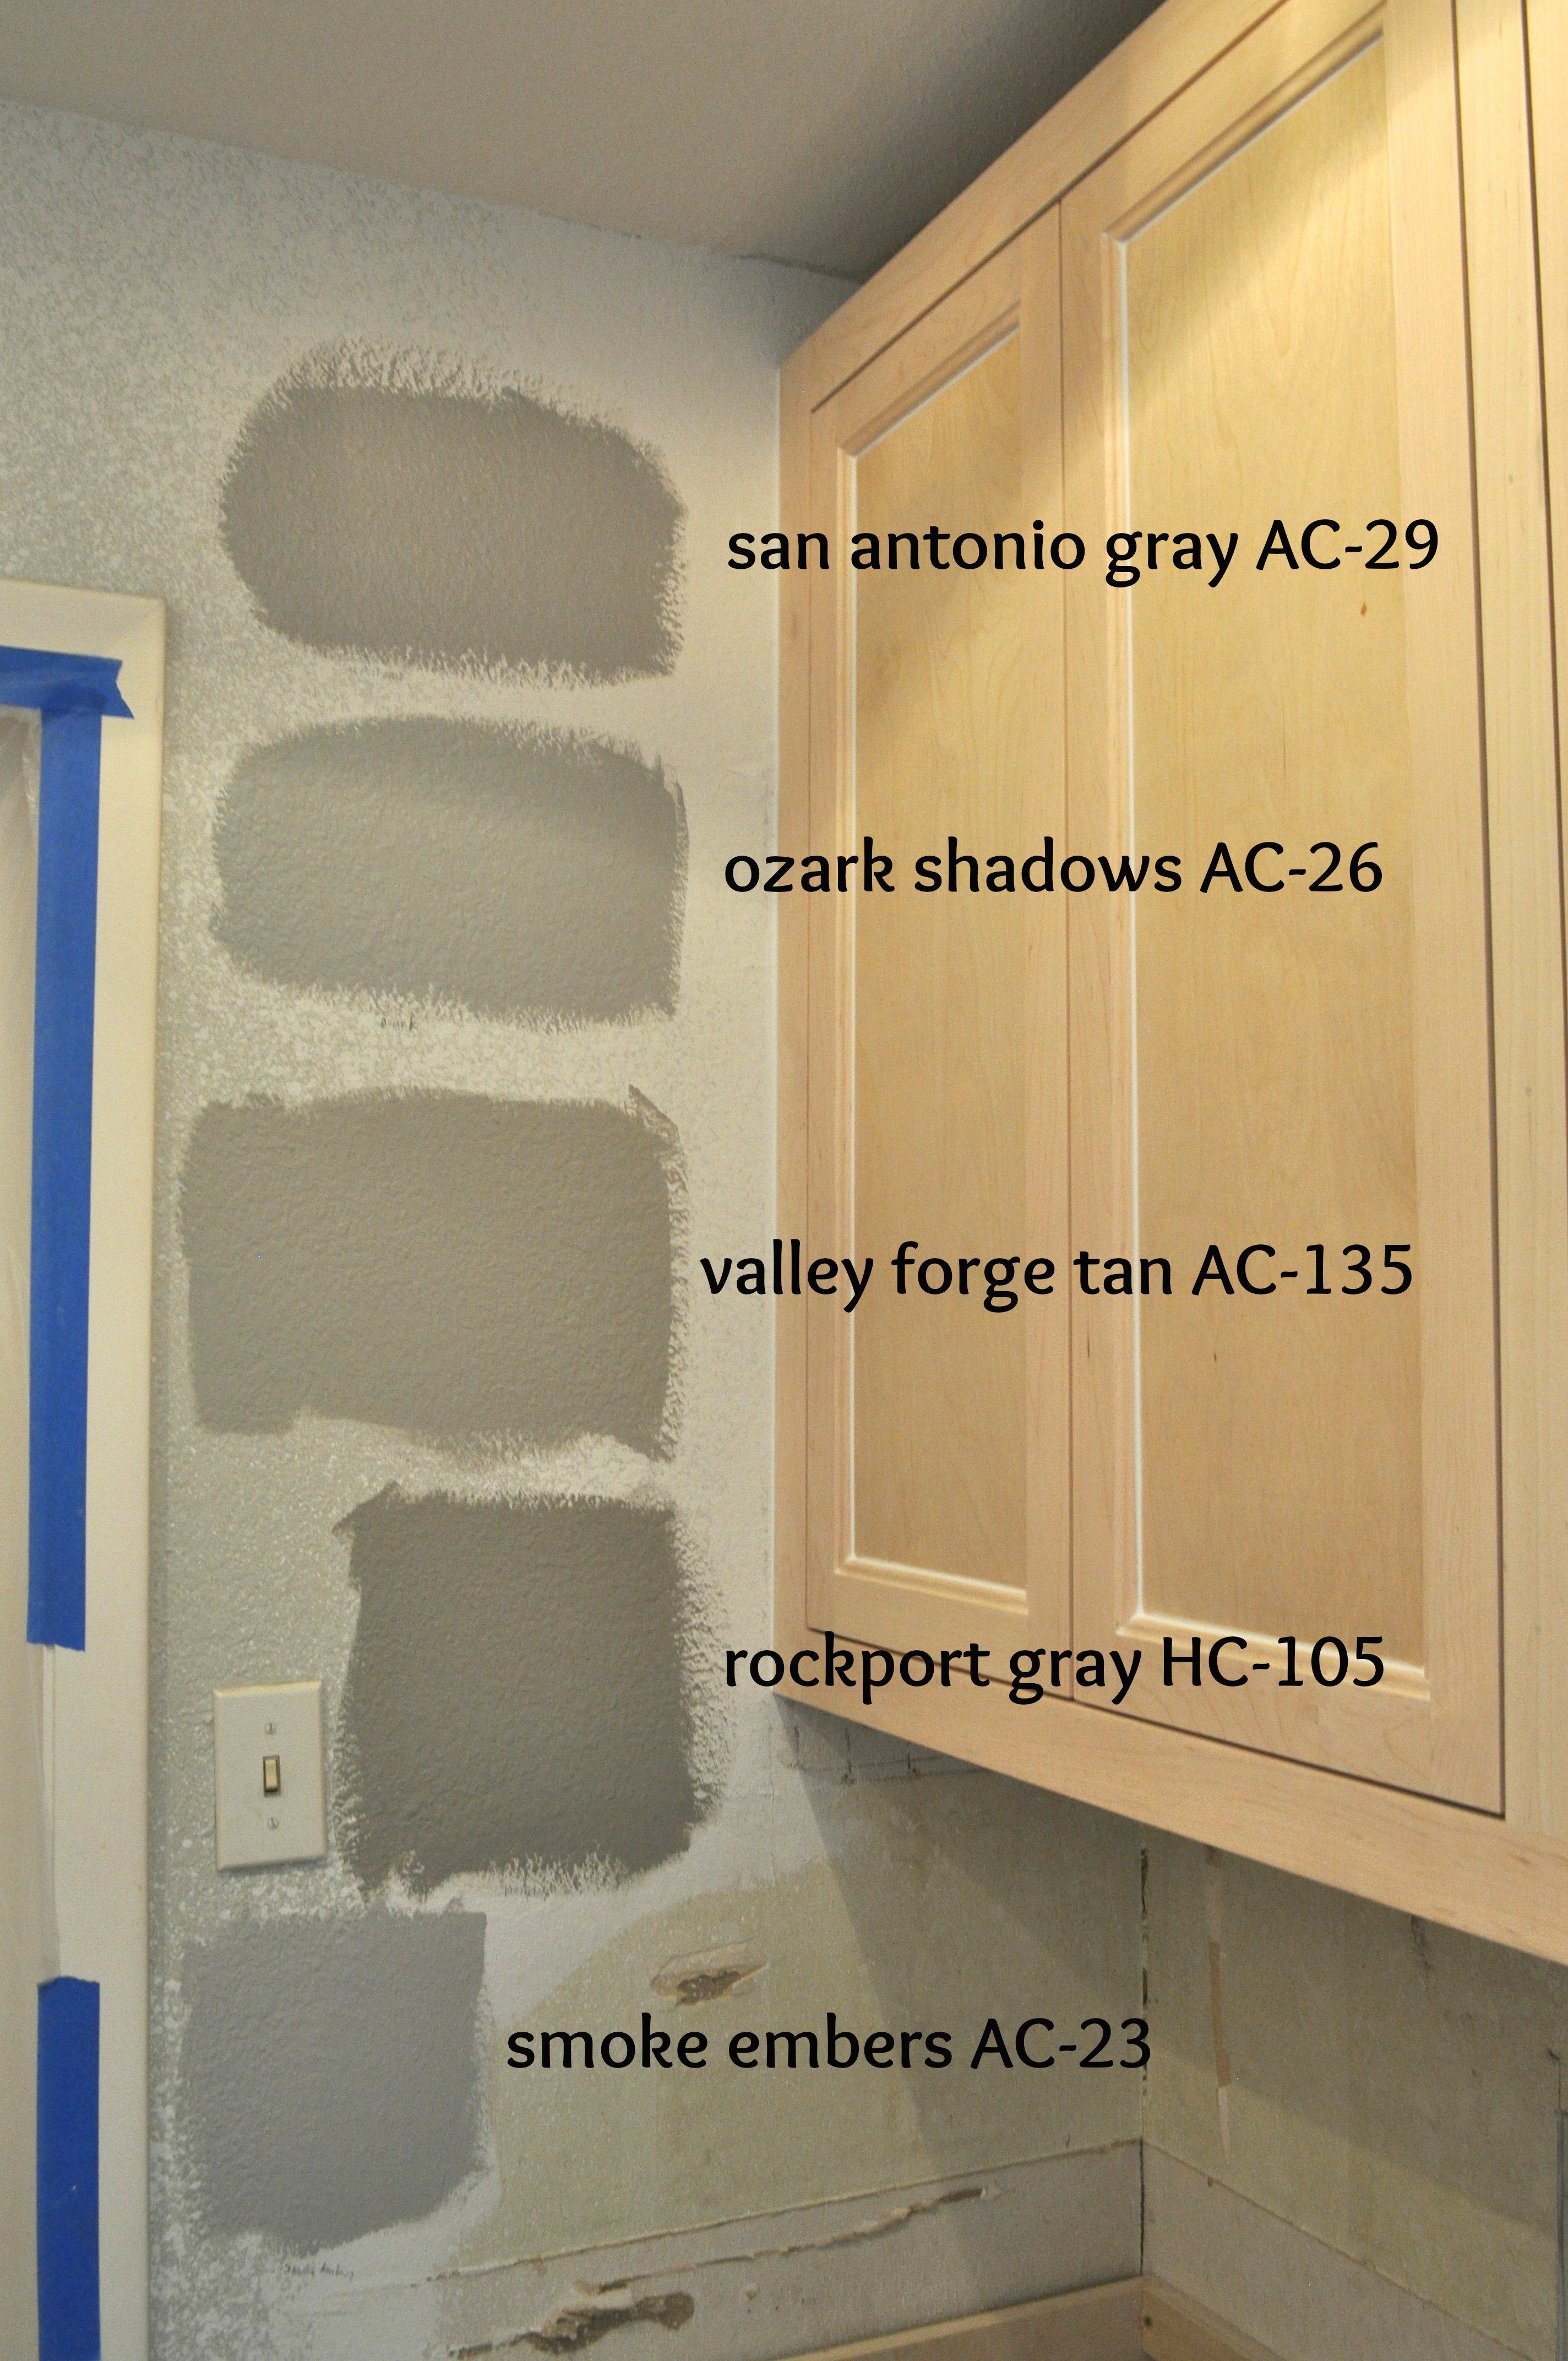
 Now that the cabinets are up, we need paint! Paint on those beautiful cabinets, crown moldings, walls, and ceiling! That’s a lot of paint! I suggest bringing as many samples as you want home. Then, check out the lighting in your space with each of the colors. We did that during the day and at night and were able to see some of the undertones you may not see at the store. Some have blue, yellow, reds…
 We fell in love with one that shined through brighter than the rest, Benjamin Moore Snowfall White OC-118. It’s a perfect white-white for our space, and I love the name! Reminds me of home! Our contractor is a Sherwin Williams guy, so we had it color matched in an acrylic semi-gloss. It’s such a glossy goodness; I will suggested it to all!
 Oh, and don’t they look gorgeous!! Below is a night picture of the cabinets drying.
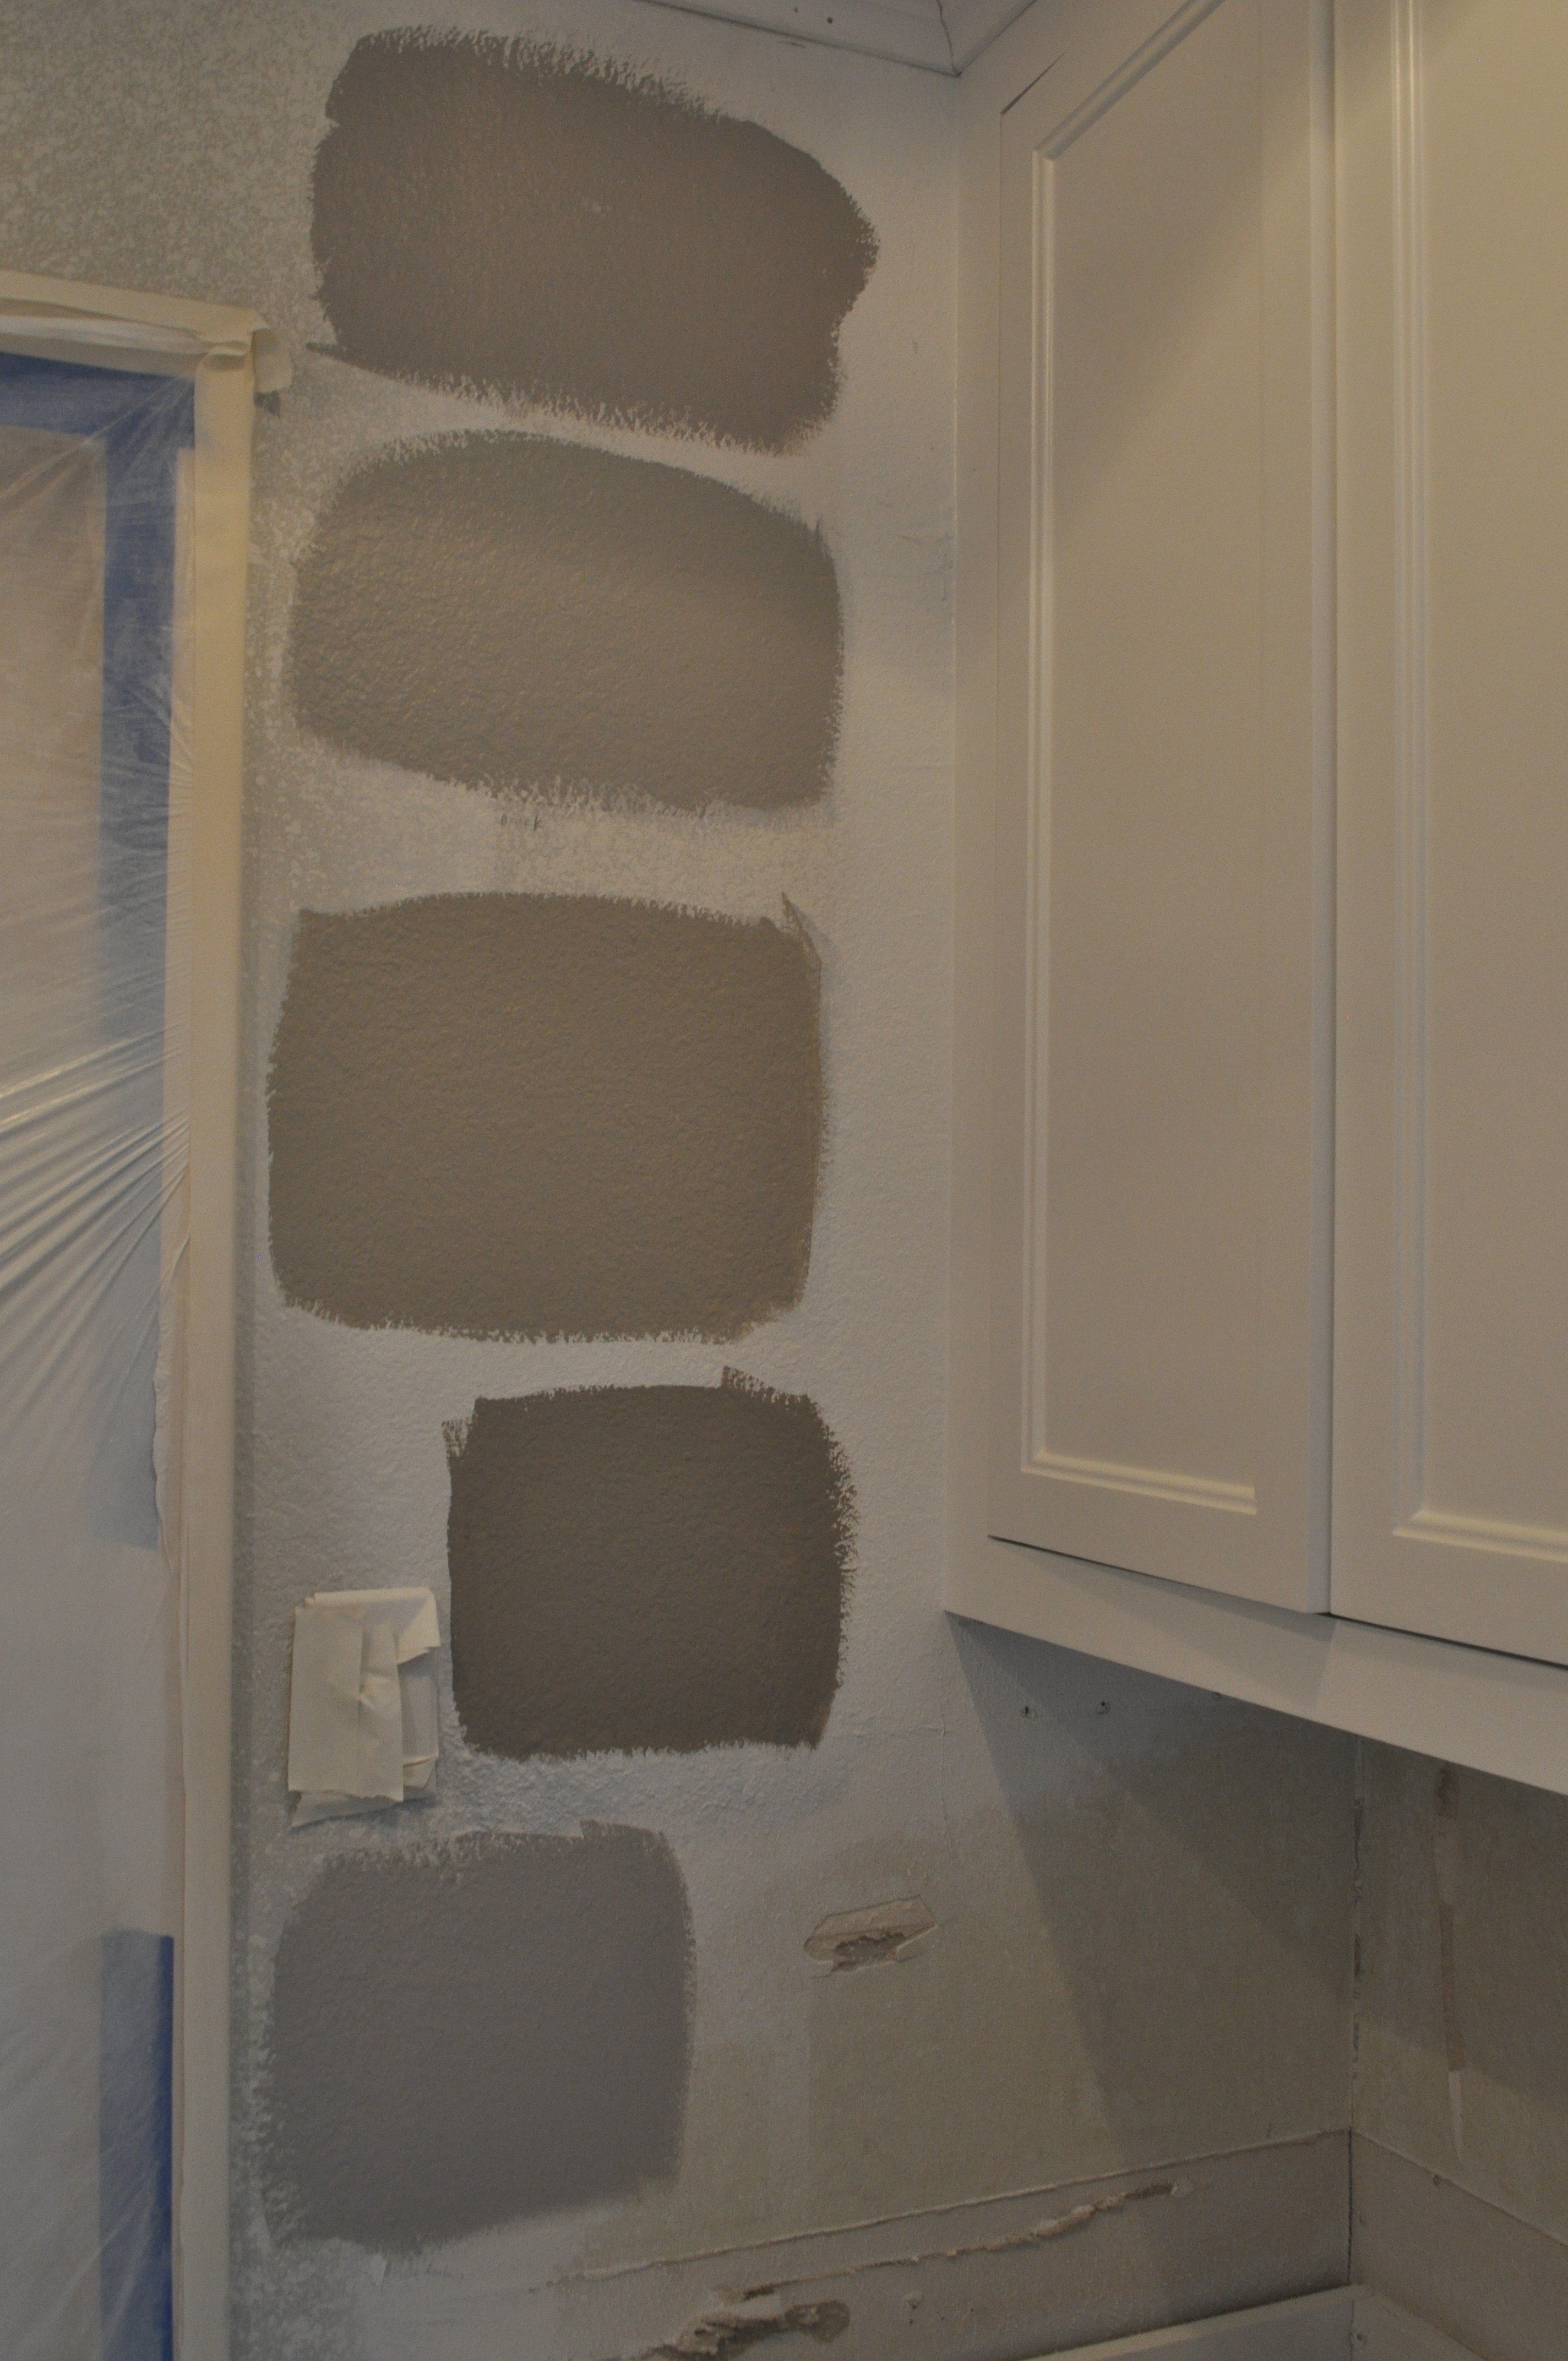
 We then moved on to the wall color! I bought a bunch of samples and painted those on the walls! We both liked Ozark Shadows AC-26, but I wanted a little less bold/dark color with the white kitchen… So, we went a step down on the color palette with Harbor Gray AC-25. Here’s the samples with both wood and white cabinets.
 Then the crown molding came in!! It was an easy decision to do the crown molding the same color as the cabinets. Glossy Benjamin Moore Snowfall White OC-118.
 Lastly that ceiling, that new ceiling with all those new lights, gets some paint, too!! We went with a standard flat ceiling paint from B. Moore, which we had leftover from our other projects. We saved a little cash, too!
 I’m just loving our choices, and it’s coming together beautifully. But yes, we need to paint that door and trim to match the space – we know!! It’s on the docket for this weekend! Here’s a before/progress pic, too!

I cannot wait for the countertops and backsplash to be here! I’ll share all that goodness next!! They are so gorgeous; I would sleep with the sample, if the hubs didn’t think I was crazy!
Thanks for reading, friends! Happy Week!

We’ve got cabbbbbinets!! If you say it like Oprah, it makes it that much more fun! They have been in the garage for a couple of days now, and I couldn’t help myself from sneaking a peak… or two… or ten!
Then the cabinet maker himself came in to install all the cabinet goodness!!


This pregnant lady is having a little withdrawal from my favorite beer season. So, in honor of not being able to actually drink beer this season, I’ve incorporated it into an amazing bread. It is part amazing goodness, part comfort food. You’ll love this bread! Plus, it super easy to make! I’ll also ask everyone who makes this bread, during the month of October, to please, please drink an Oktoberfest and/or a pumpkin ale for me… with a piece of this bread or without. Tear.
Recipe
Ingredients
Mix flour, sugar, and beer together. Spray loaf pan with cooking spray or (what I like) melted butter.

Bake bread at 350º F for 45 minutes. Pour butter over bread. Lift bread a little to let butter run down into pan.

Bake for 15 additional minutes or until golden brown. Enjoy! Easy, right?!

 Our galley kitchen before the demo. Minus our hardware which we sold on Craigslist.
I don’t think you realize the goodness (chaos) that is going on in our household. No, not the baby announcement!! We have a kitchen remodel in process, as I type this post! Actually, the contractor/workers have all gone home for the evening but you get my idea!
A couple of weeks ago, gosh more like a month ago, I started smelling this funky smell in our kitchen. It was especially prominent when I opened up the drawers, under the sink, and when we revved up our freight-train-sounding-dishwasher. The hubs didn’t smell it at first, and I started to believe this was something my pregnancy nose was conjuring up! Finally, the hubs smelled it, too, and we knew we had to do something. It smelled moldy! We had assessment peeps out and they established two things; yes, we were smelling mold, and pointed out some of it manifestations AND he, too, had no clue where it was coming from.
This meant demolition. Taking out the cabinets, at least on the sink side to expose the leak. At first, I was bummed that we didn’t get to do our kitchen remodel on our terms/timeline but then realized, this was the push we needed to just do it! We hired a contractor that was willing to work with our little galley kitchen and me, to make this space our own!
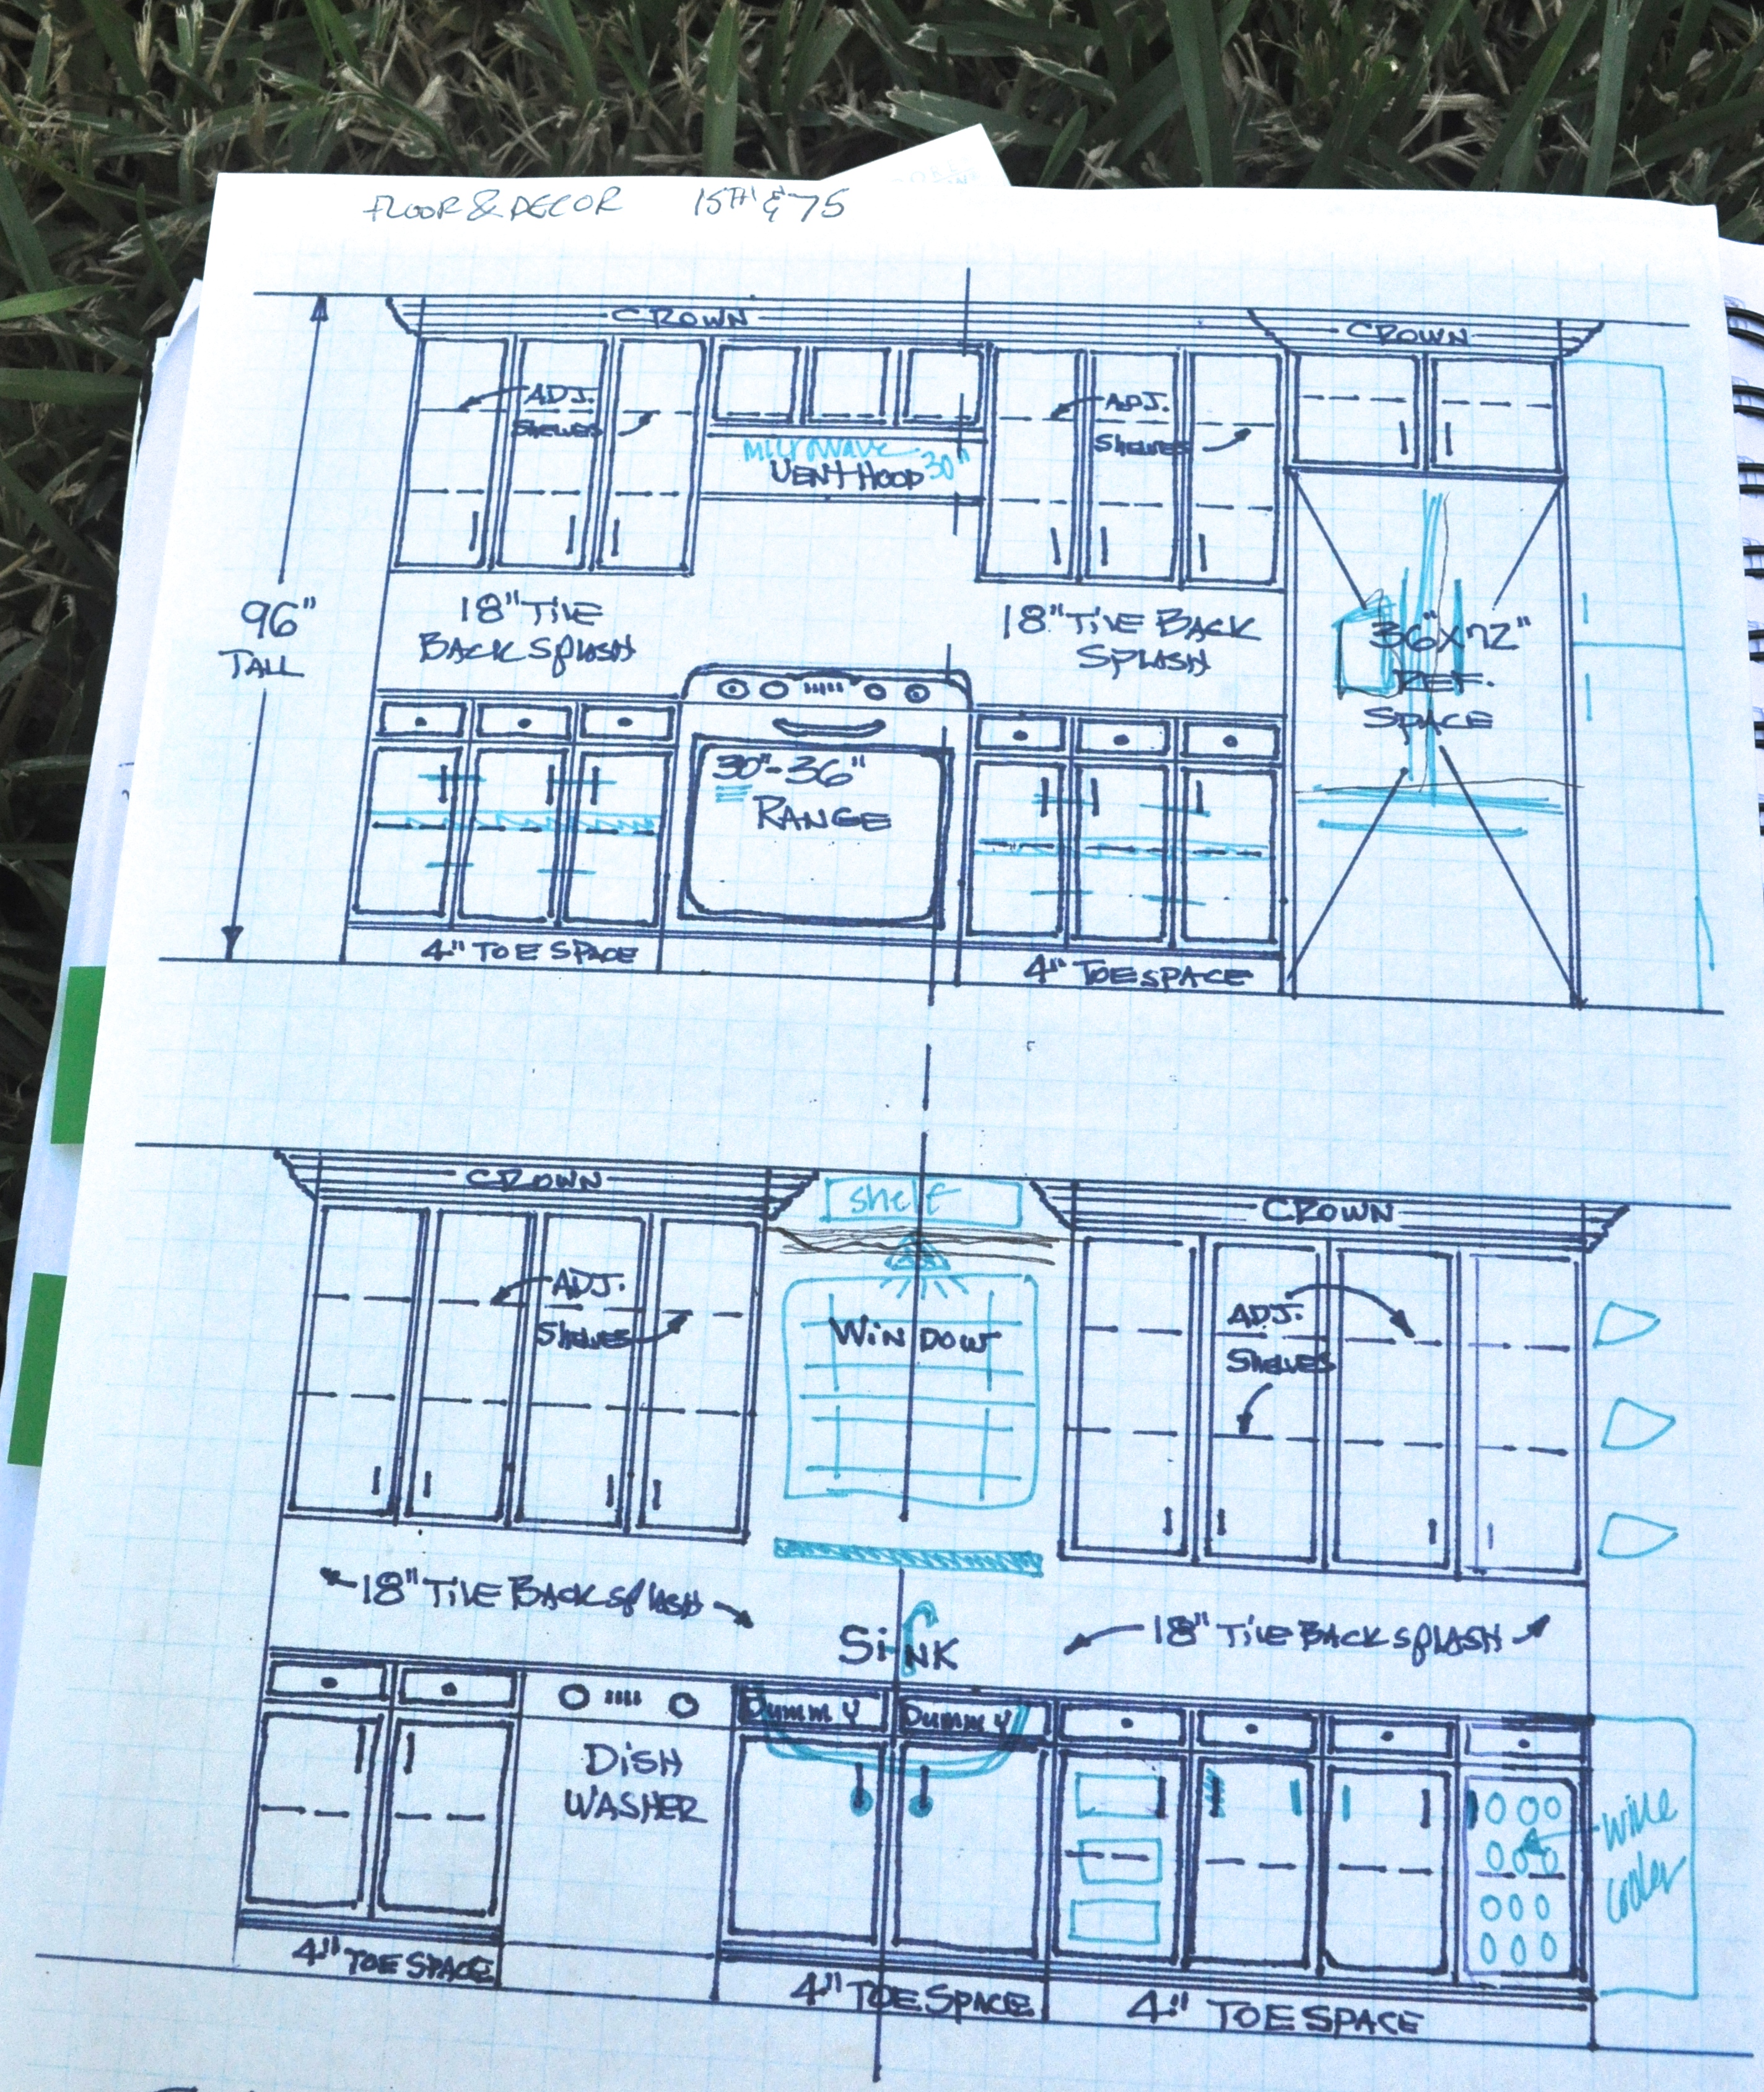
Below are a couple snapshots of the redesign and ideas I gave him for the space. We pushed our refrigerator over making more counter space for cooking, took out the furrow to extend the cabinets all the way up to the ceiling, added a wine cooler, apron sink, and put drawers next to the sink for towels!! It was wonderful living in our kitchen for three years before the planning, so we could tweak things we didn’t like throughout the space. There was a big part of me that wanted to open up the space (basically above the range) to the family room and have a more open concept kitchen; I pictured pendant lighting, a couple stools for the kiddos and the ability to see whats going on in the family room while in the kitchen. But, I was turned down numerous times for various reason. So, I’ll keep my uppers and the wall, and Jack and our baby girl will have to play unsupervised. I’m only kidding…


I’ve been riding the smoothie train for a while now, and I’ve brought the whole family along for the ride! Jack, too, has been loving smoothies! I modified my smoothie recipe here for Jack’s needs/wants, and he has been enjoying every spoonful. I’m sure many babies out there would love this recipe as much as our Jack does!
Ingredients

Combine all ingredients and blend! Simple! I put the smoothies in jars (pictured above) for the upcoming meals or snacks. If I have a lot left over or I make a double batch, I will freeze some of them in these making for a great frozen treat. Jack might be a little young to fully enjoy the frozen smoothie goodness but he did enjoy the cool push-up on those teething gums. Plus, you know exactly what is in them instead of wondering what that list of ingredients are of those “yogurt tubes”.

Jack – 9 months old
I cannot wait to add even more goodness to his smoothies, maybe even hiding fruits or vegetables he might not like as much in the future! Like kale and spinach!! Sneaky mom for the win!
Happy smoothie making, Friends!

I’m here to give all those parents wanting to try cloth diapering a boost!! Bottom line, we love them. I love that I don’t have to run to the grocery store when I’m out of diapers. Love that my heart’s happy with a little less landfill use. And, well, happy I went through with another thing I wanted to do before I even had a bambino.

Back on this post, I described how I bought 18 bumGenius Elemental One-Size All-In-One organic cloth diapers for Jack, and they are still going strong! We’ve transitioned the snaps with our growing boy, and they have worked great. Here’s a picture of them the other night after being washed!
 I usually wash them every other day or every three days. Once every other week (usually Saturday or Sunday), I wash them once regularly and a second time with bleach. It has kept them fresh and clean.
There has been one drawback to our cloth diapers. Around a year, Jack started waking up in the morning with wet pajamas. The poor kid would sleep right through the wetness, but this meant daily crib changes and it got old. At first, I bought 4 bumGenius Original Elemental diapers that had an extra layer of cotton. When that didn’t work, I used the bumGenius Originals with two layers of hemp liners. It was hit-and-miss if it worked. After talking to other moms and researching online, we decided to use regular disposable diapers at night. We use them when we travel and didn’t have this issue at night while on the road. It has worked well, and there are still a couple nights during the month that Jack wakes up with wet pajamas, but we’ll take it! I’m glad Jack stays dry through the night, and using 7 disposable diapers a week is a win in my book!
Here’s my happy baby in his white cloth diap! I think he likes them as much as we do!

That is just one of the keys to finding success with cloth diapering: don’t be set in stone, all cloth or bust! Go with the flow! Also, we love Burt’s Bees Diaper Cream! It’s a great paste and won’t ruin our diapers!!
I hope this helps anyone that is considering the cloth diaper route. If you have any questions, don’t hesitate to ask!

We had a pretty big announcement this fall!! It’s been fun conjuring up ideas for the announcement. With a plethora of pumpkins, we went with a simple two step process to make two pumpkins shine.

We found out we were having a baby girl, so I went out and spray painted a little pumpkin pastel pink; then used a Sharpie on the big pumpkin to spread the news.

We are all so thrilled to welcome another family member, and a girl in a house household of boys (hubs, jack and two boy dogs) will be awesome! I was beginning to think I was going to be a loner. I’m ready for a little girl!

After the announcement I spray painted that big pumpkin with chalkboard paint for the season! Happy Fall, Friends!


