costa rican

C.R. Cover

This Costa Rican meal was first brought to my attention by a North Dakotan. My wonderful sister-in-law (and brother, too) invited us to share a week long vacation with them in Costa Rica. They have been enjoying this vacation spot for many years and wanted to share a little bit of heaven with us. It was a wonderful experience, and I long to visit again and explore more.

Some of the things that stuck with me during our trip were the sunsets, monkeys and baby turtles, and a classic Costa Rican dish of beans, rice and eggs called gallo pinto! Yum!

Costa Rican Sunset

Monkeys

gallo pinto

source

Making this meal stateside could not be easier. I use a package Vigo black beans and rice and six eggs. For the sauce (Lizano Costa Rican goodness) I bought on amazon, which is the same sauce that can be found in the little coastal town where we stayed. It’s a huge bottle and will last a long time!!
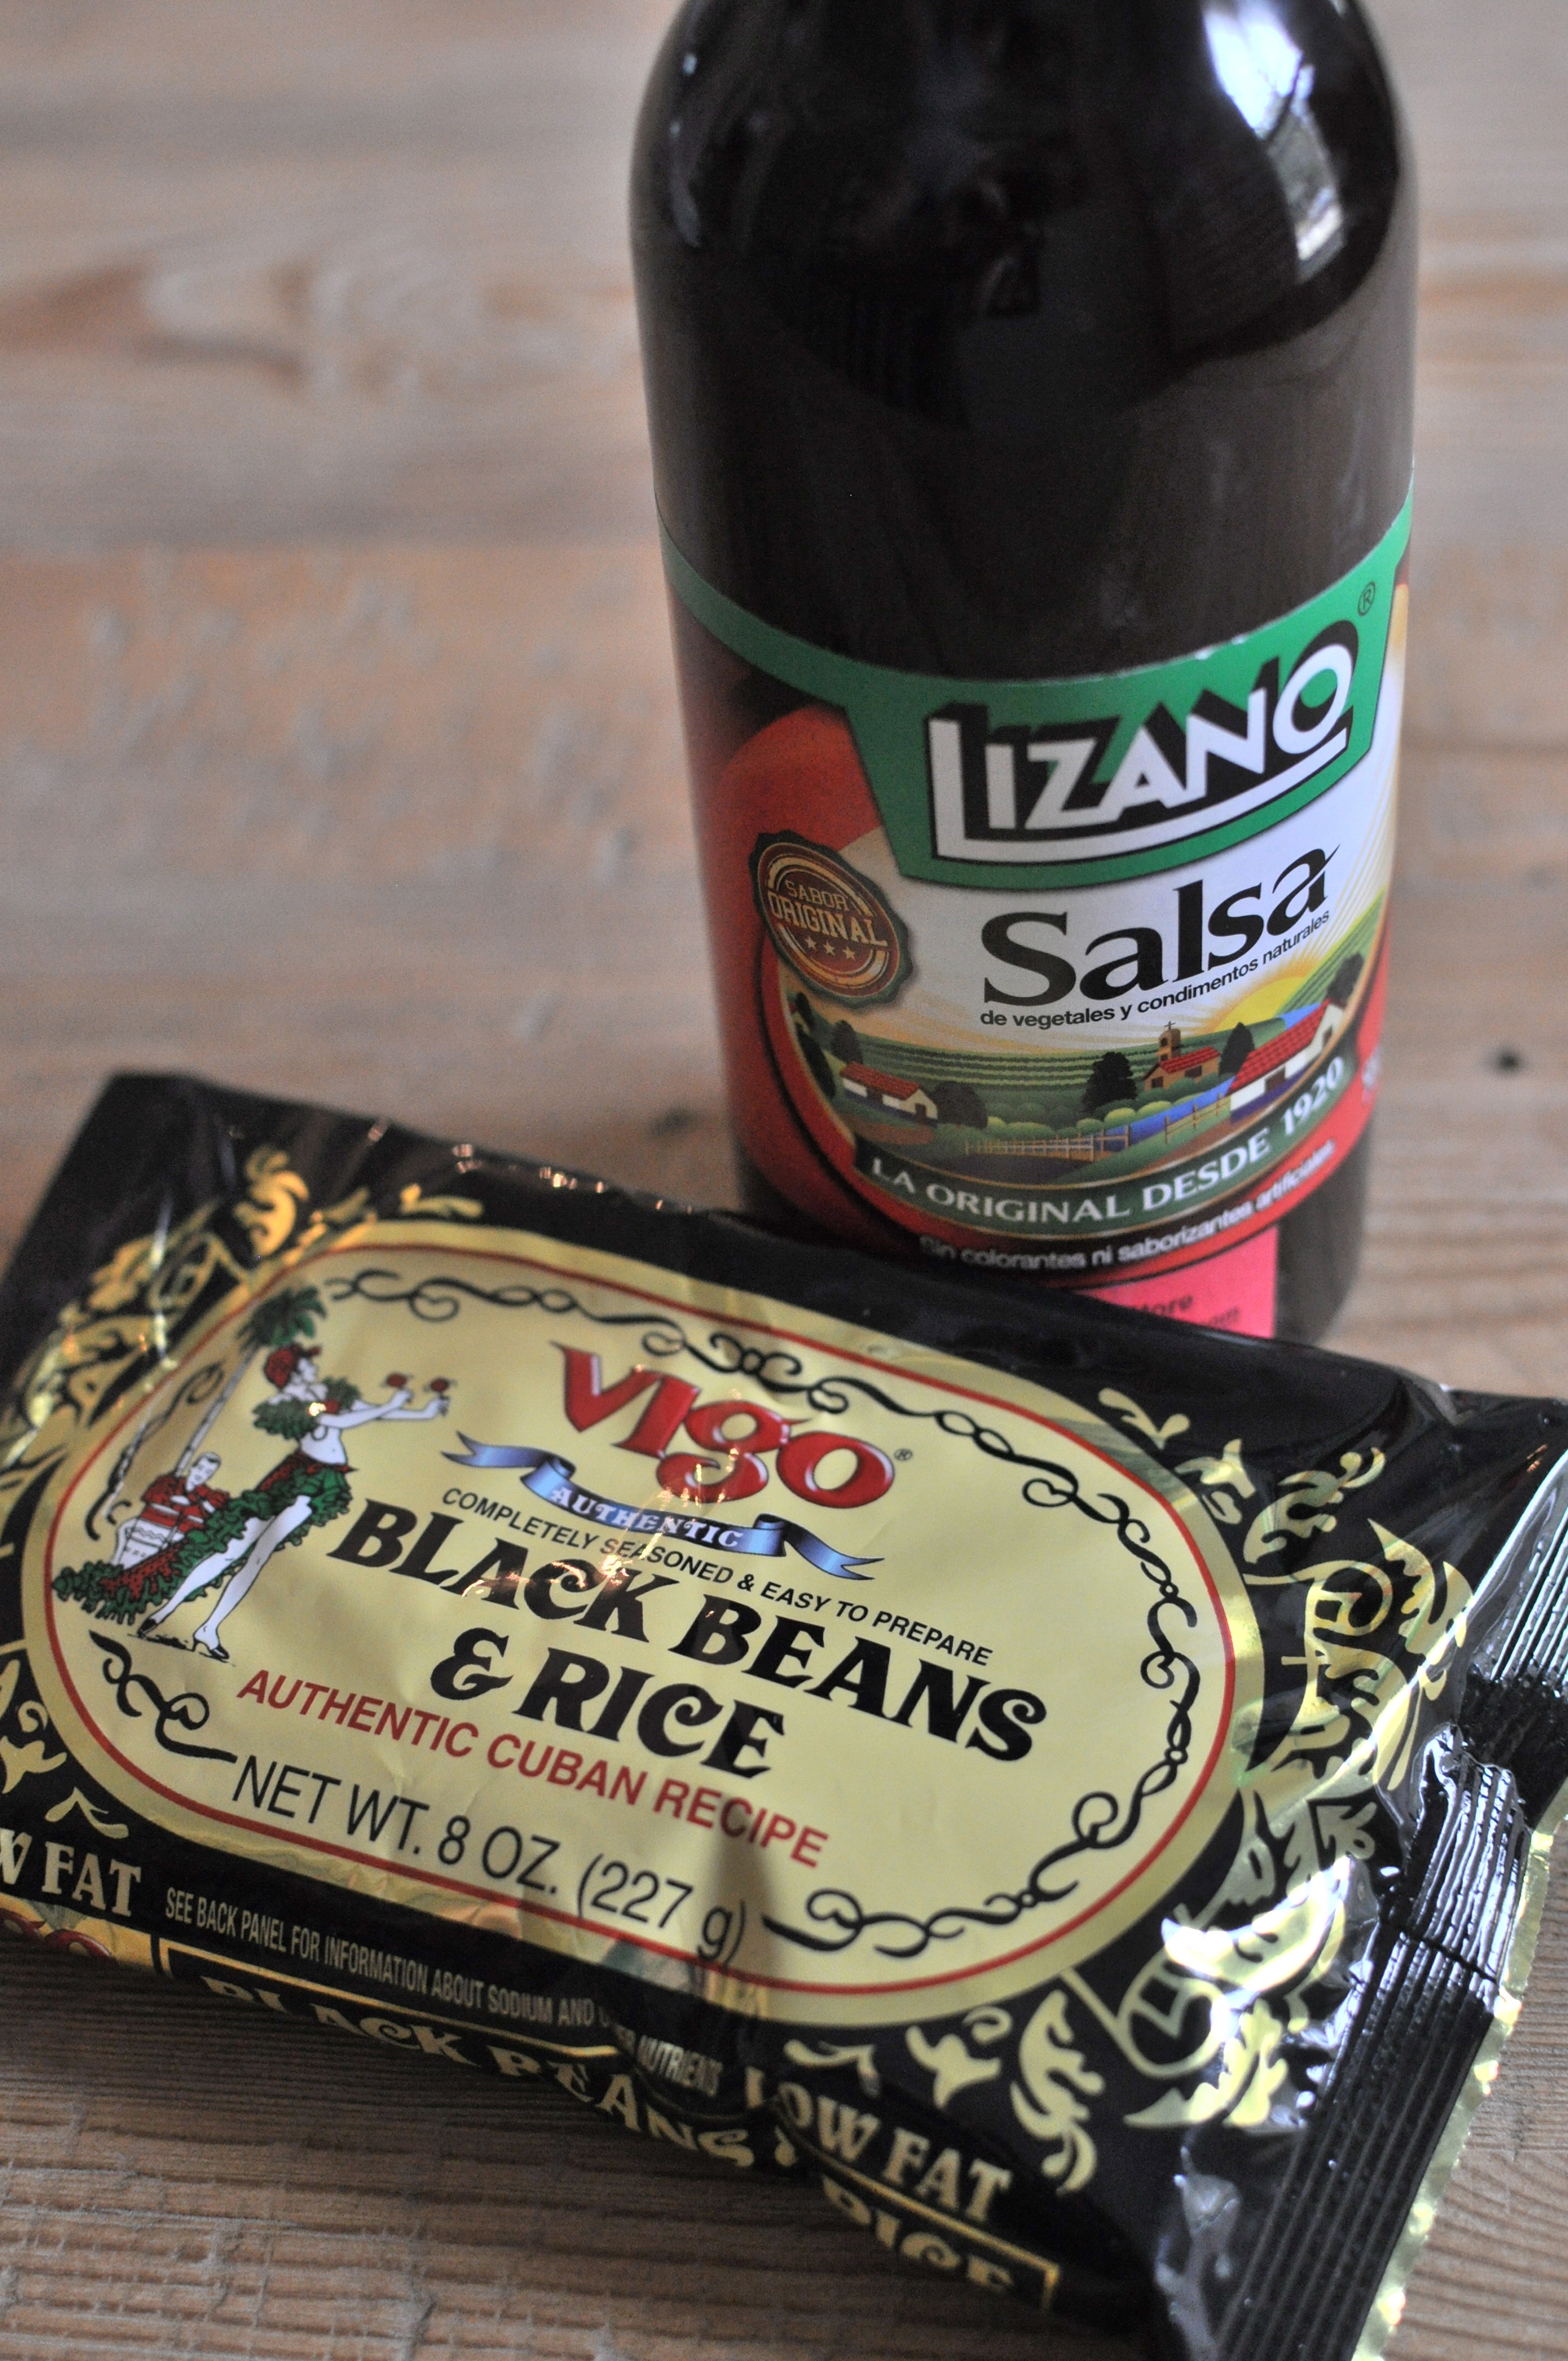
Lizano & Vigo

Recipe

Ingredients

  • Vigo black bean and rice
  • 6 egg
  • 1/4 milk
  • Lizano salsa

Cook rice and beans as directed. Whisk together eggs and milk in small bowl. Place eggs in pan on medium heat. We cook our eggs very lowly so that they are cooked through and are fluffy but a little runny.

Place rice, beans, and eggs on plate and drizzle with Costa Rican goodness, Lizano! This is a wonderful breakfast but I enjoy it anytime of the day! Enjoy!

C.R. Final

crib skirt

crib skirt cover

Our crib has this weird in-between space while the crib is set high for an infant; I felt it needed a more finished look with a crib skirt. Standard crib skirts were too long for this crib, so I had to find an alternative approach. Luckily, my favorite blogger also went with this crib for their wee-one here, so I followed some of their recommendations for crib skirting and mixed a few in of my own.

I started by cutting the panels about three inches longer than the actual width I needed. So, if the space was 10,” I added 3″ to the measurement and cut the panels 13″ long. I did this for the length as well.

crib skirt - panels

After cutting the panels, I pinned about a 1 1/2″ hem on each side.

crib skirt pinning hemThen it was off to the sewing machine to sew all the edges into place. Seriously super easy!

crib skirt sewing hem

After sewing a panel, I then used velcro to adhere the crib skirt to the crib. If I would do this again, I would buy velcro for both fabric and metal. The velcro instructions stated to use an iron on each piece for 90 seconds. It worked really well, though it was awkward trying to use the iron on the crib metal.

crib skirt velcro

Finally, it was ready for assembly. Match up the velcro and you are done!

crib skirt velcro to crib

crib skirt - one panel down

I repeated this process two more times for the side panels, and it worked really well! Obviously, I know I still need to get my mattress in there! Hopefully by the time we get the dresser and the glider, I’ll also have the mattress.

crib skirt final

crib skirt detail

In case you’re curious about the fabric, it’s from Sarah Watt’s collection. I fell in love with her collection featuring a wildlife-looking motif, and love the look of the faux wood tree rings. Others in her collection are birch trees with deer, fox, pine, and bears! So cute!

Sarah Watts

Otherwise, I hope this helps anyone else having the same issue as I had with the weird in-between space. Honestly, it was way more fun picking my own fabric than choosing a crib skirt out of a catalog! I suggest it to everyone!

no bake fudge cookies

Cover NBC

My elementary school friend Casey and I would make these, and half of them would never make their debut into cookie form. We would make a batch, eat half from the pan, and then go swimming in her pool all afternoon. Then eat the rest after. Seriously. The good old days of thinking nothing of eating a whole batch of cookies is long gone, but every time I come across this recipe, I think of her and the great times we had rollerblading, playing in her creek, and swimming. We were active kids and had great adventures.

RecipeIngredients

Ingredients

  • 1 3/4 cup sugar
  • 1/2 milk
  • 1/3 cup cocoa
  • 1/2 cup butter
  • 1/3 cup peanut butter
  • 1 teaspoon vanilla
  • 3 cup quick oats

Combine sugar, milk, cocoa and butter into saucepan and bring to a boil..

boiling NBC

Remove from heat. Cool 1 minute. Then stir in remaining ingredients.

MIxture NBC

Drop on wax or parchment paper with a teaspoon or tablespoon.

wax paper NBC

Let set and cool until they peel off the wax paper easily. This recipe makes about 25-30 cookies. I’ll admit it: I ate three before they were cool. Thanks Casey for the memories.

Final NBC

crib

The hubs and I have done many projects around our house to help improve the aesthetics and versatility of the spaces we cohabit. Never before has a project been more momentous than this one. Well, maybe our windows (pictures coming soon) or the visions I have of a new kitchen but… this one is up there. Making space for our kid! What?

Crib

This weekend, an important piece of furniture was assembled in our guest room, now called the nursery. My dad was generous enough to spoil us (and his future grandson or granddaughter) with buying the crib and mattress for our little bean. I wanted a modern looking crib with clean lines and storage for blankets and crib sheets. I also wanted it to be semi-affordable as I know the mattress and other kid stuff can get pretty pricey. We decided on the Parklane 3-in-1 crib for $300.00. Holla!

oeuf crib

Our second choice was the Oeuf crib, which also had the wood/white modern look we were wanting but with no storage and a hefty price tag of $1000.00, I was much happier with our choice. We then plan to purchase the pebble pure mattress which boasts a price tag even higher than the crib! I told my dad I would pay for half of the mattress. The pebble top is also the mattress pad which can be taken off and washed, too.

Pebble Mattress

The assembly of the crib was a smooth one. Boston (and Otis, not pictured) were happy participants in the process. They might have thought we were assembling their new crate. Ha. We only made two minor mistakes while assembling!

Building Crib 1

Building Crib 2

We are really pleased with our selection, and it makes it that much more real when you have a crib set up right across the hall from you! I peek in on it daily. I know this momentous occasion feels small in it’s time, but I’m sure I’ll be reading this exact post when he or she is moving out of our home into his/her college dorm or first apartment. I’ll probably be balling, too!

Oh, and don’t worry the dog crate and other things will be out of the room before the baby gets here.

Crib

four score…

Framed

Four score and seven years ago… actually, four and a half years ago the hubs and I tied the knot. But it wasn’t until a couple of days ago that I actually got our wedding photo framed. Don’t get me wrong, it’s been planned to be framed for years. I even incorporated framing it in the arrangement being hung up in our living room.

Arrangment

It’s the top one, still in plastic. After weeks of seeing it up on the wall with just plastic, I decided to put a faux-frame (I had sitting around the house) around the plastic. It cut off some of the wedding party on each end but it looked better than just the plastic.

Gold frame

Finally, one evening I was reading in the living room and looked up at it. It needed a real frame. I was a big girl, with a big girl job; I could afford to frame my lone wedding party photo! I snatched both the frame and the photo off the wall, and the next day I was in a local framing store weighing all my options.

At first I thought I wanted gold, like the frame I had, but the frame master at the store said to look at silvers options too, and I was convinced that it looked the best. It took me four-and-a-half-years to frame the photo and about ten minutes to actually pick a frame and glass. I was amazed. Why hadn’t I done this years ago!?! Oh, right, framing can get expensive! Ha. Two weeks later I was able to pick it up, and I headed straight home to replace the empty spot with a correctly framed photo.

Final Frame

I am in love with my decision and so happy to see all my closest friends and family all framed up! This wall is a nice homage to some of the special travel spots the hubs and I have loved! I love looking at these when I’m sitting in our living room or walking through the front door. I hope our visitors like it, too!

Final Framing

dill pickle chip crusted salmon

cover

A few weeks ago, I Facebooked about my love for Dill Pickle Chips north of the Mason-Dixon Line, and guess what appeared at my door step! Yep, a whole lot of Dill Pickle chip goodness!
Old Dutch Pickle Chips

Our Aunt Nancy read my facebook status and made a trip to her local store to pick them up and ship them down to Texas! It was one of those amazing surprises! If that wasn’t enough, she also added in a couple craft items that she created! We already have them displayed and will love them for years to come!

Tile

Scrabble

I brought the Dill Pickle Chips to work to share (only one bag) with my co-workers. They loved them as much as I did and mentioned they tasted much like salt and vinegar chips with dill. That got me thinking about a recipe I would make all too often with my roommate Jessica (well, she lived above me but she might as well have been my roommate) in PA school. She wasn’t a fan of fish, and this was the first dish I could get her to try to move into the world of eating fish. It’s a recipe modified from Young & Hungry by Dave Lieberman.

Recipe

Ingredients

  • 16 oz salmon
  • salt
  • freshly ground black pepper
  • 1/4 bag of kettle-cooked potato chips (or dill pickle chips)
  • Zest of 1/2 lime
  • 1/8 cup chopped fresh dill (I didn’t use this time, my chips were already dilled!)
  • Olive oil

Preheat the oven to 400°F. Line a baking sheet with aluminum foil. Lay the salmon, skin side down, in the center of the baking sheet. Season it lightly with salt and pepper.

Crush the potato chips, lime zest, and dill together in a bowl until the chips resemble coarse crumbs. Mix in 2 tablespoons of olive oil until incorporated.

chip mixture

Coat the salmon with a thin, even layer of potato chip crumbs. Pat them on the fish gently so they stay put.

chipped up salmon

Bake for about 20-25 minutes, or until the chip coating is nicely browned.

oven crisp

This recipe serves 4 -5 people. If it’s just the hubs and I eating, I usually start with a smaller piece of fish. Enjoy!

final

baby announcement

Original

Many people lately have been asking how we told our parents we were expecting. So, I figured I would fill you in on what we did to announce our pregnancy. Way back in October, we decided to have our regular session of professional photos taken for the holiday session. This time we chose Vintage Bloom Photography; she was a sweet photographer who recently moved from Colorado to Texas. We were considering starting “trying” that month, so we decided as part of the photography session (for a couple photos) we would be including baby footwear.
baby tomsThe photographer was all for it and very excited for both of us! She even mentioned being more than happy to do my pregnancy photography. Though, I was kind of nervous we were jinxing ourselves on the whole baby thing, we went ahead with the photos and the husband reassured me that such jinxing was improbable.

When the time came and we found out we were actually expecting, we decided to blow up that same picture and photoshop a little note that read: baby snitker august 2013. We put them in nice 8×10 frames for both our parents and had them open it as their very last gift during our Christmas festivities.
baby 8.4.13Needless to say everyone was overjoyed with our news; there were some tears of joy, and everyone was very excited to have another little bean added to our extended family.

With the frame, we figured we could always send more pictures to be switched out of the little guy or gal during each stage of development.

ombrecupcakes

source

Another exciting announcement comes when we find out the gender of our bean at 20 weeks. We are very much considering finding out (okay, I think its a done deal), and I think a fun way to have people find out would be shipping our families little cupcakes from a local bakery either with the gender written on them or pink or blue cakes! Then, have them all open them via FaceTime or Skype! Kinda fun when we don’t all live in the same town!

These are just two ways we celebrated/plan to celebrate the amazing process of expecting and gender announcements. The bambino will make his or her own announcement on their own time in August. I can’t wait to see what date he or she picks! I hope nothing goes wrong that we need to be induced or have a cesarian section. I just want the little dude or dudette to come as it pleases! I’m sure mothers are laughing at me because I know around 36-40 weeks, every mother wants that baby out as soon as possible. I’ve seen it.

master bathroom decor

Master bathroom final

My master bathroom got some love the other weekend and I would love to share the results. Nothing crazy, but some fun flare to help finish the space. This could be a great way (cheap, too) to help your own space.

This is how it looked before.

Painted

I loved the stripes but I need some art! I also wanted a designated space for my makeup brushes and bag because they were always set on the counter. I went to West Elm with a gift certificate and picked up a fun metallic lacquered tray. They come in a bunch of colors and I have a couple around the house that I love! It’s a fun addition to help structure the space.

West Elm Tray

I had a frame laying around, too! I bought this wall art that fit with the color scheme. It may or may not stay in the space but it’s been fun having it in the space for the time being. Whales in the bathroom?!? I’m just talking about the watercolor! Ha!

Etsy Print

These are just two great ways to help evolve a space. A little wall art and a tray can transition a space well!

nursery design board

Please excuse my design board. It’s the cut-and-paste variety but I heart it all the same and hope you get the idea.

Nursery Mood Board

Source list: menagerie bookend & rolling storage crates – serena & lily, giraffe bust – anthropologie, squared lacquered tray – west elm, martini side table – west elm, bird’s nest hanging lamp – serena & lily, parklane 3-in-1 crib – wal-mart, presidio glider – senera & lily or grano gliding recliner, Pouf – DIY’d, patchwork dresser – west elm.

I plan on keeping the wall color Benjamin Moore Pashima AF-100 and staying very gender neutral, as we’re on the fence about finding out the gender at 20 weeks. If I do find out, I can incorporate more gender specific details and maybe paint the ceiling or the closet a corresponding pastel color. Oh, the possibilities!

Honestly, I always thought I would be the girl that could wait until the birth for the big reveal. I was always a believer, big believer in: Santa, The Tooth Fairy, and Easter Bunny. Never would I think to search for presents or Easter candy prior to the big event. But this little person growing inside of me has me feeling differently. I seem to want to know with each passing day if it’s a little boy or girl in there. Isn’t 20 weeks a long enough wait!?! Ha. I think you can see which side of the fence I’m leaning on. I’ll keep you posted with the baby and nursery!

tuna burgers

Burgers

Tuna burgers have been a staple in my household since elementary school. It was a simple dish easily whipped up after my two hardworking parents got home from work. I really loved them. Transitioning them to my own household was another story. The husband was willing to try them but doesn’t like tuna from a can or miracle whip. It was kind of a lost cause but I pressed on and made them anyway.

Ingredients

  • 1 can tuna
  • 2 Tablespoons celery
  • 2 tablespoons onion
  • Cheddar cheese(small cubes or shredded)
  • Miracle Whip (to taste)
  • 4 buns or hards rolls

Mix all ingredients together.

Mixture

Lightly butter hard rolls or buns. Add mixture to buns. Wrap with aluminum foil and bake 350 for 20 minutes until melted and hot throughout. I still love them and yes, the husband confirmed his dislike from both tuna in a can and miracle whip. I shamelessly ate two.

foil